Mother’s Day 2.0 – Baking Chocolate Babka!

SONY DSC

My mother wasn’t big on what she called Hallmark holidays. She believed that everyday should be mother’s day, just as much as she believed everyday should be children’s day and father’s day for that matter. If you think about it, she was right. Why celebrate someone you love only one day a year? Aren’t they special everyday? Do we need a card company to remind us to be nice to our mothers? I’m not suggesting bringing your mother flowers everyday, or making her breakfast in bed in every spare moment, and having dinners out every Sunday, but when you really think about it, it’s not that difficult just to do something nice for those we love.

What does this have to do with babka? Well, everything. I don’t like gifts on “mother’s day” – flowers yes, gifts not so much. I like spending time with my family; that’s my gift. This past Sunday, not the “official mother’s day” was my mother’s day. My son Ethan titled it Mother’s Day 2.0 – an upgraded version so to speak! We didn’t all sit down to breakfast together, I wasn’t served breakfast in bed, and yes, I did the dishes! What made it my day was that everyone did something with me and planned a day for us to be together. This started with making babka with my older son Jarred. I’m pretty sure he will be the one to carry on the family recipes and for that I’m extremely glad.

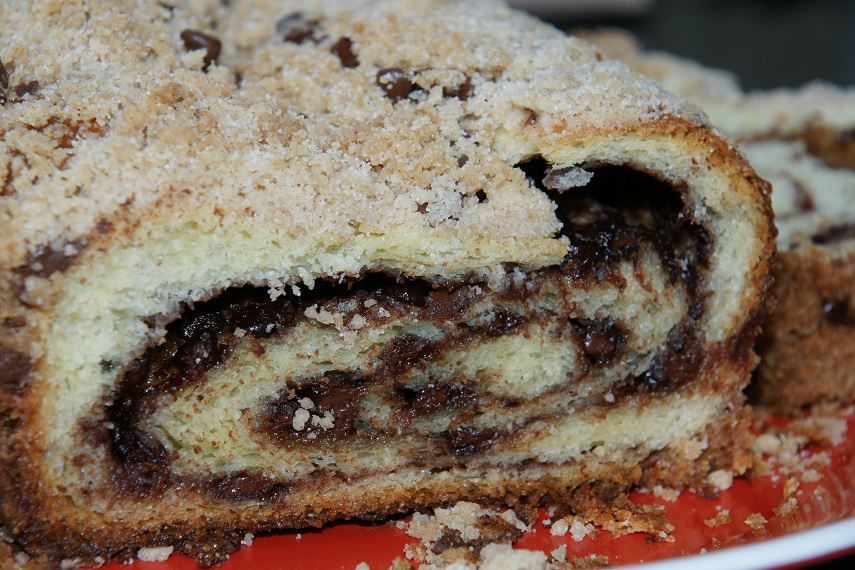
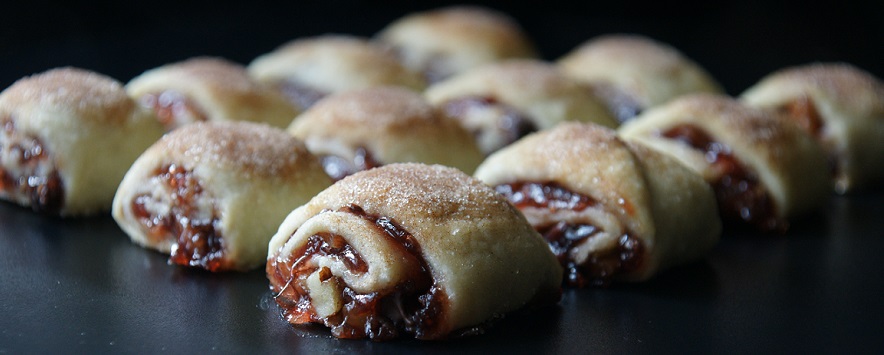
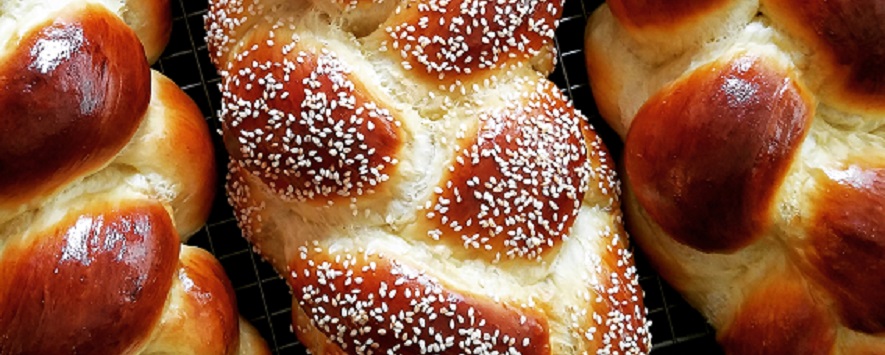
Babka is an Eastern European sweet yeast bread that is classified as a coffee cake. If you live in the northeast or you’re a Seinfeld fan you know there are 2 kinds of babka – a chocolate babka and a cinnamon babka. Check out this clip from Seinfeld with Jerry and Elaine, it’s truly a classic! Chocolate babka is the more popular of the two. In the show, they describe the cinnamon babka as the lesser babka, which in all honesty I don’t necessarily agree with. Chocolate is my favorite so we decided to try that one first. I have always thought it was difficult to make – turns out, the toughest part is waiting for the dough to rise! My friend Marcy makes babka all the time and now I know why! So here’s the recipe and be patient; enjoy a nice cup of coffee while you’re waiting.

SONY DSC

Recipe for the Yeast Dough (makes two 8″ loaves)

1/4 cup warm water plus 1 teaspoon sugar (around 110 degrees)
1  1/2 tablespoons active dry yeast (or 2 packages)
1/4 cup sugar
2  1/2 cups all-purpose flour
3/4 teaspoon salt (I used pink sea salt)
1 stick butter melted
2 extra large eggs (at room temperature)*
1 teaspoon pure vanilla extract
1 large egg for the egg wash (this will be brushed on before the streusel is added)

*eggs should always be room temperature when baking. You can put them in warm water for about 5 minutes if you forget to take them out ahead of time. Doing this will help the eggs blend well with the room temperature butter.

In a measuring cup add 1/4 warm water and 1 teaspoon sugar. Sprinkle in the yeast and stir. Set aside for about 5 minutes until the yeast has bubbled and created a foam on top.

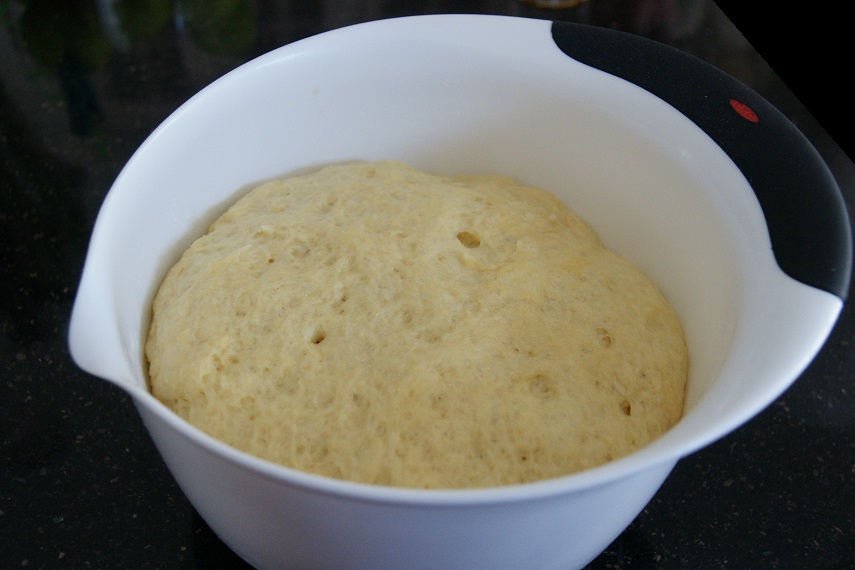
While the yeast is blooming you can put the dough together. In a medium size mixing bowl add all the dry ingredients and stir with a fork to combine. In a separate bowl mix the eggs, butter and vanilla. Add the wet ingredients to the dry including the yeast. I kneaded the dough in the bowl for just a couple of minutes to combine. Cover the bowl with plastic wrap and place it in a warm spot to rise until double in size (about 1 hour or maybe a little more).

While the dough is rising, put together the filling and streusel topping below.

SONY DSC

Chocolate Filling

1 stick butter softened (not melted)
1/4 cup cocoa powder
1/2 cup sugar
pinch of salt

2/3 cup good quality mini chocolate chips

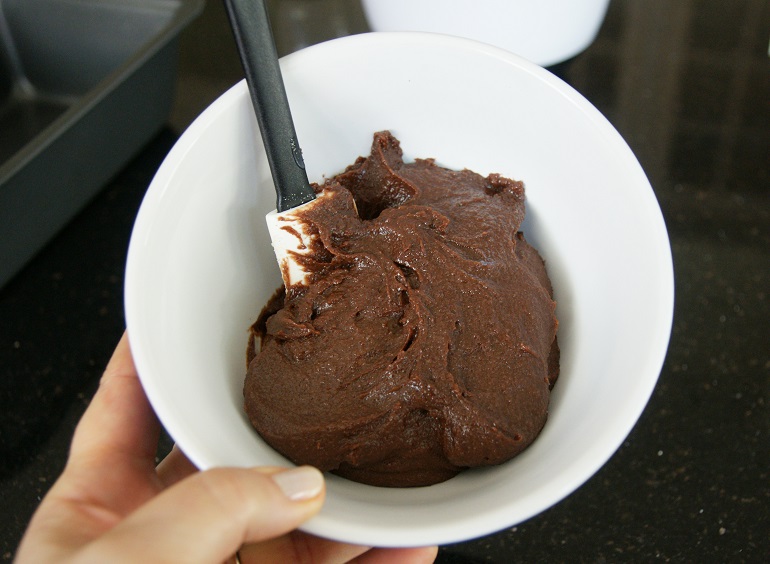
In a small bowl, sift the cocoa into the sugar and salt. Mix in the butter until well blended, cover and set aside. The chips will be sprinkled on top of the filling. Please note: If the mixture is too soft, put it in the fridge to firm up. It should be the consistency of easy to spread peanut butter.

SONY DSC

Streusel Topping

1/3 cup butter melted
1/2 cup all-purpose flour
1/3 cup sugar
1/2 teaspoon cinnamon
1/2 teaspoon pure vanilla extract (or almond extract)
1/4 teaspoon baking powder
1/4 teaspoon salt

In a small bowl, sift all the dry ingredients together. Add the melted butter and extract, stir with a fork until combined and crumbs form. Cover with plastic wrap and set aside.

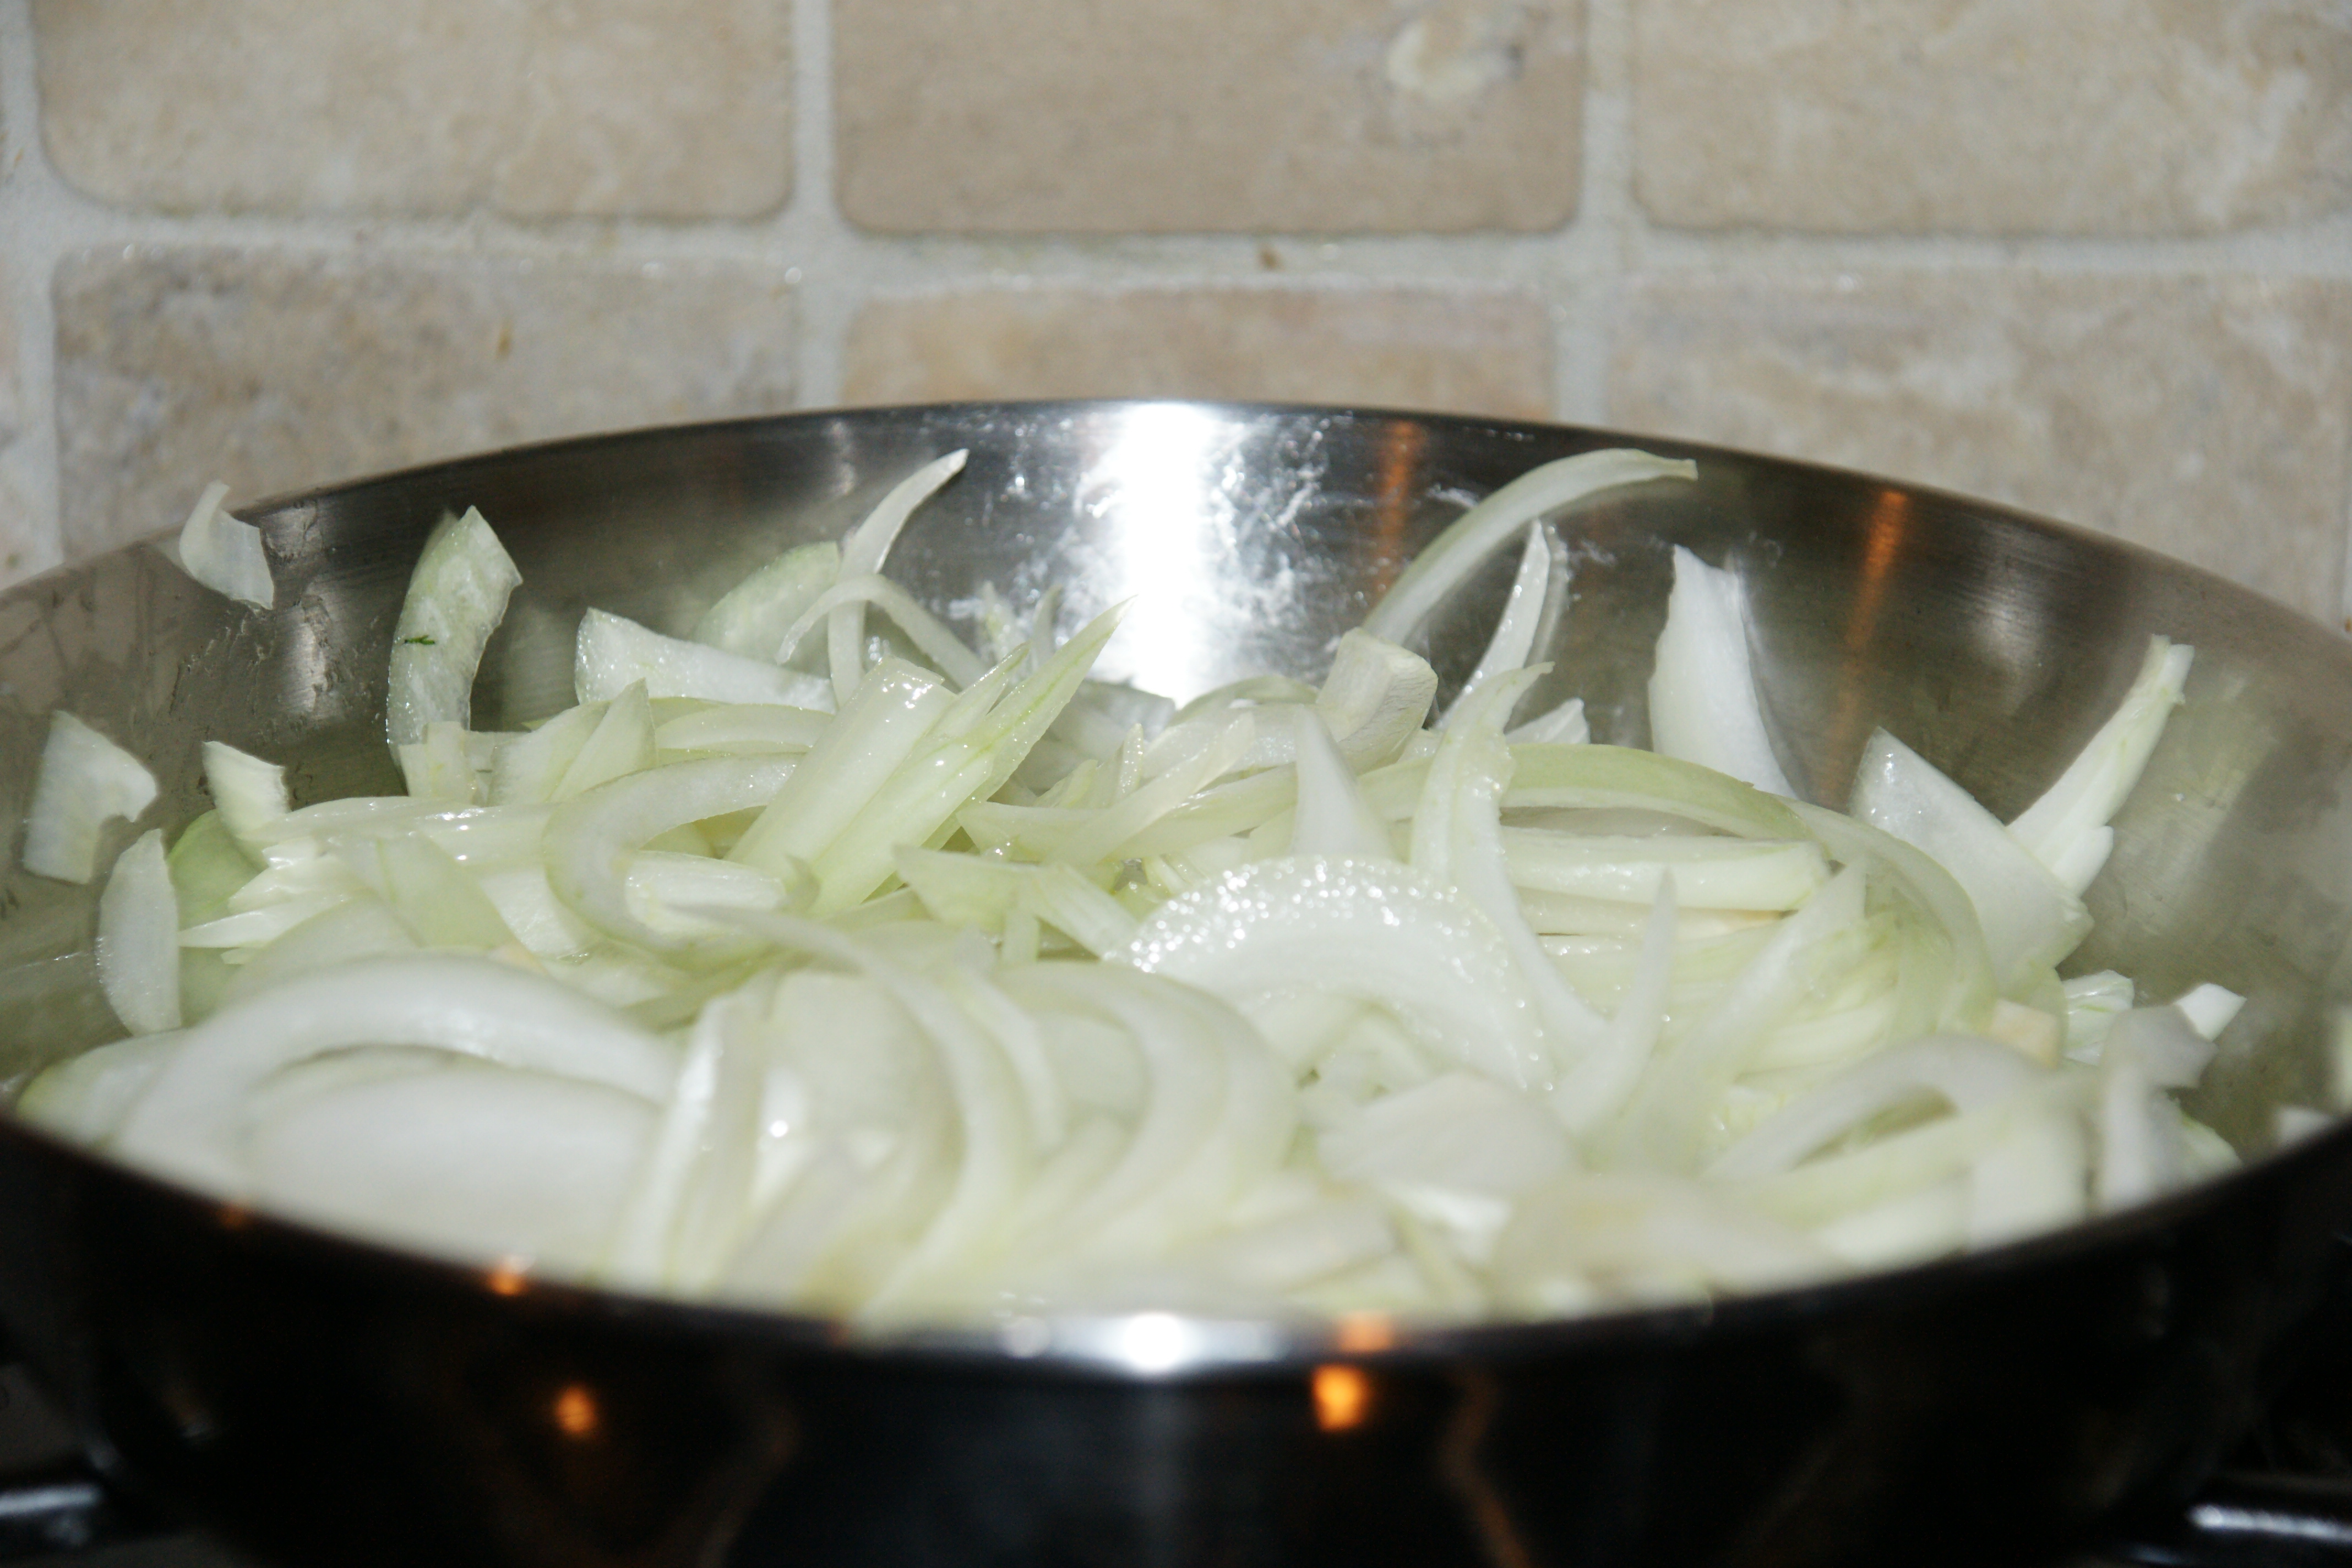
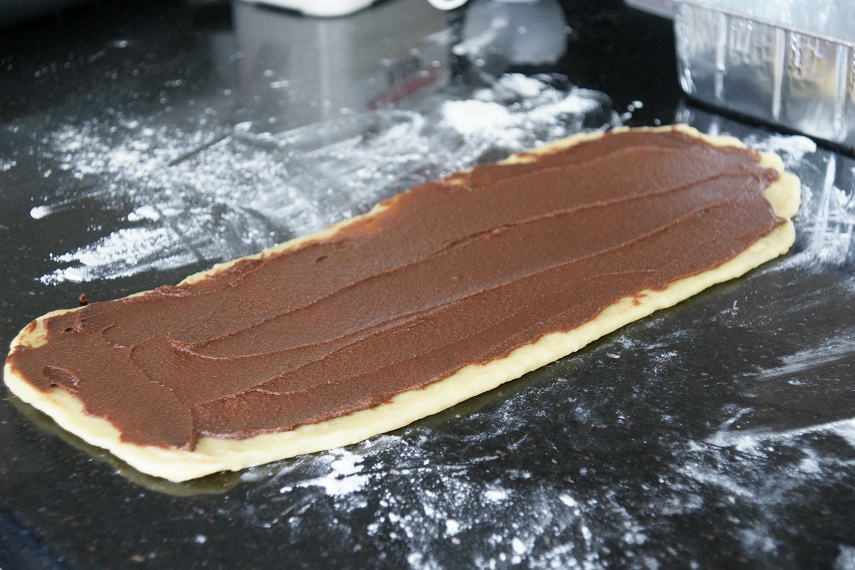
Once the dough is doubled in size, punch it down, take it out of the bowl and place on a well floured surface. Split the dough into two pieces using a knife or dough scraper. Make sure you have enough flour on the board so that when you roll out the dough it doesn’t stick. Roll out one piece of dough into an 8″ x 12″ rectangle, it should be about 1/8″ thick.

With a spatula, spread 1/2 the chocolate filling mixture and then sprinkle 1/3 of the miniature chips on top.

SONY DSC

SONY DSC

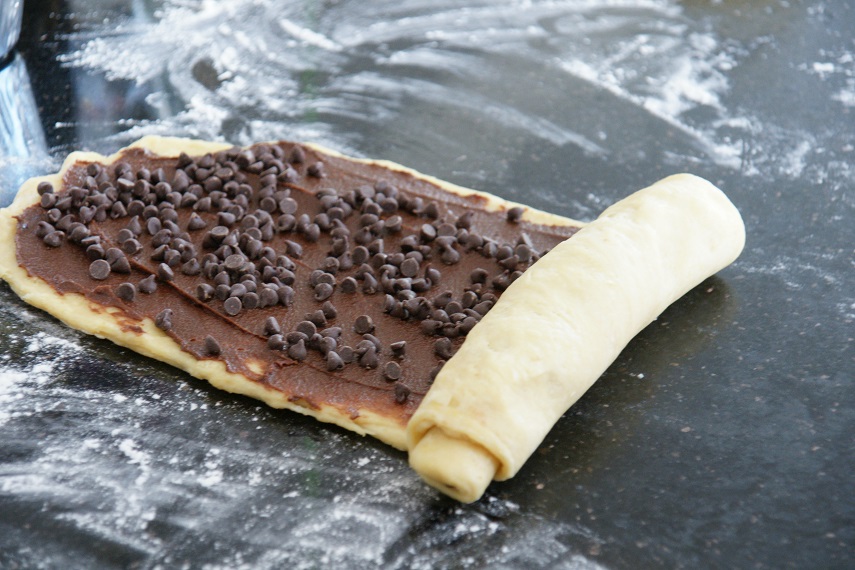
Starting at the bottom edge, roll the dough into a tight log. There are many ways to form a babka, you can fold the log in half and twist it, you can cut it into pieces and place them on top of each other, or even make it like monkey bread. For my first time out, I thought simple was best and kept it in a log. Place the log into an 8″ x 4″ aluminum loaf pan that has been buttered generously or sprayed with canola oil. Repeat this process with the second piece of dough. Now they are ready for their second rising. Place plastic wrap on top and place in a warm place for another hour or more.

SONY DSC

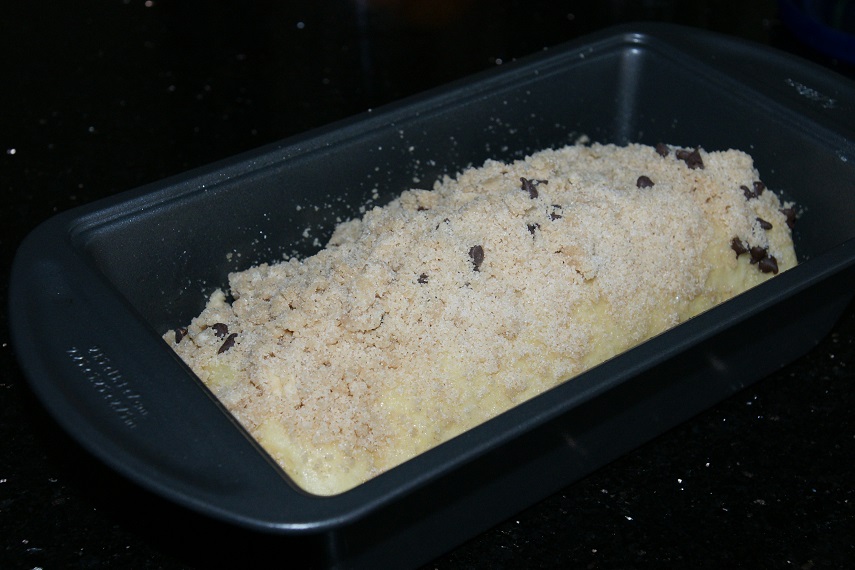
Preheat your oven to 350 degrees with your baking rack in the center of the oven. After the second rising it should be almost double in size. Now it’s ready to brush with egg wash, do this very lightly as you don’t want them to deflate. Sprinkle each with 1/2 the streusel mixture and place in preheated oven. Bake for 30 to 35 minutes or until lightly brown on top. If they are browning too much, place a piece of foil on top.

SONY DSC


A Day in Brooklyn… Sal’s Pizzeria

At first you might wonder how this classifies as one of my favorite things on a food blog. It won’t take you long to see why.

In 1989 I moved back to Brooklyn for a few years and shared an apartment with my sister. I’d have to say they were really fun years, probably some of the best in my life. We lived on Court Street in what is known as the Cobble Hill/Carrol Garden’s area. Back then, the neighborhood was rich in Italian culture and walking home from the train at night from the hustle and bustle of the city was like really coming home. You could pass by the fish store and the owner would wave to you from the window, Jim or Andy from the fruit market ran out to tell you what came in fresh that day, and the smell of bread from the many bakeries permeated the air in the street.

Saturday was laundry day and my sister and I would walk a few blocks to the laundromat put our clothes in a machine and walk across the street to Sal’s Pizzeria for a couple slices of pizza while we waited for the clothes to wash. In my mind, this is some of the best pizza there is. My sister and I love pizza, always have but it has to be really good pizza. Back then no one worried about eating too many carbs, or food allergies, or about eating dairy – you just ate and enjoyed. In addition to their pizza, the pasta is so fresh and light – don’t even get me started on how delicious the eggplant parmesan is!

SONY DSC

In April, we were in NY and had what we called a “Brooklyn day” with my sister and her kids. We try to do that whenever we can. Each time we do, having a slice at Sal’s is a must. Sal’s son John is the owner now. Both of his parent’s have since passed away. The restaurant was opened in 1957 and his father bought it in 1970 when John was just 10 years old. He told us how cool he and his siblings thought it was that they owned a pizza place. They would go there after school, eat there, do their homework there, then he and his brother and sister helped serve dinner. He still lives around the corner. This guy is the salt of the earth and whenever we go back to Brooklyn and eat at his restaurant (which is every couple of years) he always remembers us and that is something special; especially since we haven’t lived there in over 20 years.

SONY DSC

Going there really is like coming home. The pizza is just as delicious now as it always was. While the area around his restaurant has changed, the high quality and integrity of their food remains the same. On this visit we sat in the extension of his restaurant, Mama Maria’s named after his mother. We ordered a delicious black kale salad with pine nuts, and wish I had the recipe for the dressing – one of the best salads I have ever had! Of course we had to have pizza so we ordered a plain cheese pie. In addition to that we had the bruschetta pizza filled with sweet teardrop tomatoes and garlic. My son ordered fettuccine Alfredo that was so light and fresh with just the right amount of everything. Finally we had to have a cannoli but sadly found out that it’s no longer on the menu. It was his mother’s secret recipe. Instead he offered us tiramisu – who could say no to that? It was light, creamy, and had just the perfect hint of cocoa, espresso and cinnamon.

SONY DSC

Now we are into the next generation of our family. As you can see, they love it as much as we do and always look forward to going back. With the changing landscape of Brooklyn, Sal’s Pizzeria is a refreshing historic gem. I only hope the gentrification of this area can appreciate what they have and support him. I know I’m doing my part all the way from Ohio!  Sal’s Pizzeria/Mama Maria’s 307 Court Street, Brooklyn, New York. 718-852-6890

The Absolute Best Chocolate Chip Cookies!

SONY DSC

I have been in the mood for home-baked chocolate chip cookies for some time now. I think it might be ever since I read the book The Great American Chocolate Chip Cookie Book: Scrumptious Recipes & Fabled History From Toll House to Cookie Cake Pie by Carolyn Wyman. It’s a really interesting read which contains not only the history of the chocolate chip cookie but, in her opinion, where to get the best ones around the country. Carolyn listed state by state the best places she found. There are a lot of fun facts and stories, she really did her homework – I highly recommend reading it. One thing I may not have mentioned about me, I inherited the love of reading cookbooks from my mother. She would read them as if they were novels and I totally get that.

As far as I’m concerned, chocolate chip cookies have to be the most absolute perfect cookie. They can be a lot of things all at one time: chewy, crispy, cakey, ooey-gooey, sweet, salty, yummy and comforting! With or without nuts, crispy or chewy, dark chocolate chips or chunks, they are so versatile and my all time favorite cookie.

So today I celebrate you. I celebrate you big and small, hot out of the oven, with a tall ice cold glass of milk!

SONY DSC

With one recipe I made them all different sizes yielding different textures and ultimately taste. I made miniature ones that are a one bite cookie and crunchy, then the next size which I baked for less time to yield a chewy cookie and finally larger ones which were crispy on the outside and chewy on the inside. A cookie for everyone in my house!

SONY DSC

Now for my favorites… of course everyone has their personal favorite. I’ve always been a fan of the original Nestle Toll House. In fact, when my family goes on vacation to Disney World, they know we’re not leaving without having a Toll House cookie ice cream sandwich at The Main Street Bakery. When I lived in NYC and had a tiny kitchen, there was always a bag of Tate’s Cookies (formerly known as Kathleen’s Cookies) in our apartment. They are simply the crispest, lightest and most delectable cookie, you won’t believe they come from a package. I have tried to make them from her recipe, but they don’t come out the same and I’m kind of glad about that. Now when I do have one of her cookies it takes me back to a great time and memory when my girlfriends and I would meet in the park with our babies! Now for my current favorite… drum roll please… my version of Jacques Torre’s Secret Chocolate Chip Cookie. Not such a secret if he let Martha Stewart publish it on her website, or the New York Times! However, I’m betting you didn’t know about it! So let’s keep this just between us! Below is his recipe adapted with a few adjustments. For starters, I cut the recipe in half as the original recipe makes 8 1/2 dozen cookies! I also cut down on the sugar, added a little more salt and vanilla.

SONY DSC

2 sticks unsalted butter softened at room temperature
1 cup brown sugar
3/4 cup granulated sugar
2 extra large eggs*
1 – 1/2 cups plus 1 tablespoon pastry flour
1 – 1/2 cups bread flour
1 – 3/4 teaspoons sea salt
1 teaspoon baking powder
1 teaspoon baking soda
2 teaspoons pure vanilla extract
1 pound best quality semisweet or bittersweet chocolate chips (or combination)
(for mini cookies, use only miniature chocolate chips)

Preheat your oven to 350 degrees. Line baking sheets with parchment paper and set aside.

In a large bowl cream together butter and sugars with an electric mixer. Add eggs and and vanilla, mixing well. In a separate bowl add all the dry ingredients. Reduce speed on the mixer and add the dry ingredients a little at a time. Add the chips or chopped chocolate and mix until combined.

For the mini cookies, I used a 1/2 teaspoon measuring spoon yielding a 1″ cookie. For the next size I used a 1 – 1/2″ teaspoon cookie scoop yielding a 2″ cookie. Place on prepared cookie sheet about 1″ apart for the smaller cookies and 2″ apart for the larger ones. Make sure to keep the same size cookies together on the baking sheet as they will bake at different speeds.

Bake the mini cookies for 6 to 8 minutes or until lightly browned. The larger cookies will take about 8 to 10 minutes. If you make what I call jumbo sized cookies using a 1/4 cup (4oz.) scoop for a 5″ cookie, bake for closer to 18 to 20 minutes. Keep in mind, cookies will continue to cook a little more on the baking sheet when you take them out of the oven. And you can adjust the baking time according to the type of cookie you like, more time for crispy, less time for chewy. Cool slightly on baking sheets before transferring to a wire rack to cool.

SONY DSC

This recipe will makes thirteen  5″ cookies or 4 1/2 dozen 2″ cookies or if you want the cuties like I made, you’ll get somewhere around 300 mini’s! That’s why I did a combination. If I only wanted minis, I would have cut the recipe in half.  Enjoy!

*eggs should always be room temperature when baking. You can put them in warm water for about 5 minutes if you forget to take them out ahead of time. Doing this will help the eggs blend well with the room temperature butter.

SONY DSC


How to Caramelize Onions

Caramelized onions (also called smothered or fried onions) are a favorite in our family. My nephew loves them on a turkey burger (as do I) and my son Ethan loves them on anything – even pizza! They are great to top a burger or fish, the base for so many recipes, and the type of onions you need for a LEO (lox, eggs, and onions) or my mothers famous potatoes, eggs and onions! If you have never tried them, you must. When the onions cook down they release all of their natural sugars and become soft, silky and sweet.

I found this recipe in the Arthur Schwartz cookbook Jewish Home Cooking a few years ago and have been using it ever since. It makes it very simple and works well every time. I modified it a little as per how I make them according to his recipe. Caramelized onions are a part of so many of my recipes that it’s a must to include in my blog. This is a guide on how to make them so adjust the amounts according to each individual recipe. Enjoy!

SONY DSC
This is what they look like when they get into their olive oil bath getting ready for a shvitz*!

First either chop or slice the onions according to the recipe instructions that call for caramelized onions. Add enough oil to cover the bottom of a covered skillet or sauté pan. You can use any oil you like, just make sure it has a high smoke point such as: olive, canola, safflower, sunflower, grape-seed, or vegetable. There is a new oil out on the market I’m in love with… avocado oil, but it’s too expensive to fry onions in! I always use olive oil, choosing it for heart health and the taste.

Use a pan large enough to comfortably hold the onions. A 10-inch pan will hold up to 2 pounds of onions or 6 cups (that’s about 3 to 4 really large onions) and will require about 3 tablespoons of oil. Heat the oil over medium high heat.

Add the onions and toss in the hot oil; cover the pan, decrease the heat to medium and let the onions sweat for 10 minutes, tossing them every 5 minutes. After about 10 to 15 minutes, you can add in 3 cloves of minced garlic and a pinch of salt. Original smothered onions do not have garlic added, I just like the taste but you can omit if you’d prefer. Stir and cover for 5 minutes. Uncover the pan and stir the onions, they will have begun to brown.

SONY DSC
Here they are right before I add in the minced garlic. The onions have decreased in volume by half.

Increase the heat to medium-high and continue to fry the onions uncovered for at least 20 minutes more for browned onions. Continue to stir the onions every 5 minutes as they cook, scraping up the bits on the bottom of the pan. (It’s good to use a straight-edged wooden spoon or spatula for this.) The onions may need more frequent stirring as they brown. If you like them darker cook for another 5 to 10 minutes. At this point you can add a pinch of black pepper and a pinch of salt. They can be stored in the refrigerator, tightly covered for a couple of weeks.

It may seem like a lot of work, but it’s not really. Like with anything you’re cooking on the stove top, you have to keep an eye on it and stir occasionally. Total cooking time is about 35 – 40 minutes but they can be cooking while you are doing other things, or made ahead.

Here they are getting all sweet and golden brown. They are great now but can brown a little longer.
Now they are about 1/4 of the volume you started with. They are sweet and golden brown. Depending on the recipe, you can stop here or cook them a little longer if you want them to brown more.

*What is a shvitz you ask? It is the Yiddish word meaning to sweat. It is used interchangeably with how you feel when you’re hot, or if you want to take a steam bath! Right now it’s so hot in my house I’m going to turn the thermostat down before I shvitz to death!

Brownie Biscotti

SONY DSC

My oldest son came home from college on Friday and I had anticipated baking for his arrival. I like everything to be fresh baked; I’m not a bake and freeze it kind of girl. Sometimes that doesn’t always work out in my favor. With baseball season still going on, I was very limited in time for baking so I ended up picking up some of his favorite ice cream to say welcome home! He didn’t mind and we planned to bake together over the weekend.

Last night I made a plan before I went to sleep so that this morning I could bake early and so that I would have time to exercise and then get on with the day. I woke up and baked 2 banana breads (check out that recipe on my site) which came out delicious, but then felt like I needed something chocolate. Originally I was going to make my mother’s mandel brodt (Jewish biscotti) recipe which he loves but I wanted to try something new. I came across this recipe a couple of weeks ago in Susie Fishbein’s cookbook Kosher by Design Teens and 20-Somethings. If you haven’t read any of her cookbooks, you must. Whether you keep kosher or not, they are absolutely beautiful and her recipes are easy, and always a crowd pleaser. I just ordered her book entitled Cooking Coach and can’t wait till it arrives! I have a girlfriend that cooks a lot of her recipes and I’m lucky enough to enjoy them when she does! Anyway, her title was chocolate chocolate chip sticks. She said they are a cross between a brownie and biscotti. My son described it by saying the outside was like a biscotti and the inside like a brownie, pretty much a win-win!. Since I changed some ingredients, I also changed the name.

SONY DSC

I renamed it (of course!) with what it tasted like to us and added my own splash to it with vanilla extract, espresso powder and by sprinkling it with coarse sanding sugar to give it a sparkle and crunch! I have to tell you, they are amazing. However, I wish I had used white chips and added walnuts or even almonds to it, I think they would have enhanced the cookie (if that’s even possible!). I needed two hands for this dough and couldn’t photograph the process. However, I will definitely make them again so will plan ahead for that and since my son is home recruit him as photographer.

I will say that shaping the logs was a little difficult but I came up with a good way to do it. In the book it says to use parchment paper but I found that didn’t work for me. When I make my mother’s mandel bread, I use plastic wrap to mold the dough into logs. That worked very well here too. It’s very crumbly, so heads up on that. But very much worth the effort so don’t let that stop you. Enjoy!

Preheat oven to 350 degrees. Line a cookie sheet with parchment paper and set aside.

1  1/2 cups all-purpose flour
3/4 cup Dutch processed cocoa*
1 teaspoon baking soda
1/2 teaspoon fine sea salt (I used pink Himalayan sea salt)
3/4 cup canola oil (I used light olive oil)
1/2 cup sugar
1/2 cup firmly packed light brown sugar (I used dark brown)
1 extra large egg
1 teaspoon vanilla extract
1 teaspoon instant coffee
1/2 cup white chocolate chips, or semi-sweet (or combination)
1/2 cup chopped walnuts (optional)

In a medium bowl, mix the first four ingredients with a whisk.

In a larger mixing bowl, mix the oil, sugars, instant coffee and egg very well. Add the vanilla extract and incorporate.

Mix the dry ingredients into the wet 1/2 at a time. Add the chocolate chips and or nuts. The dough was very crumbly. Susie Fishbein says to knead the dough at this point but I found it difficult to do. At this point I put on rubber gloves and started mixing it by hand. When I was able to get it to hold somewhat of a shape, I split it into two.

I put out plastic wrap on the counter and transferred half the dough on top. I formed a log about 2 to 3 inches wide by about 8 inches in length. I then transferred it to the cookie sheet by sliding it off the plastic wrap. Some of the pieces crumbled off so I pushed them back together. Leave at least 2 to 3 inches between the loaves as they spread.

Bake for 25 minutes. Remove from the oven and cool for 10 minutes. Using a serrated knife, cut into 3/4″ slices.

Yield about 24 cookies

*What’s the difference between Dutch processed cocoa and regular cocoa powder? I believe David Lebovitz explains it best. Check out his blog:

http://www.davidlebovitz.com/2010/02/cocoa-powder-faq-dutch-process-v/

SONY DSC

SONY DSC